| (18 intermediate revisions by 3 users not shown) | |||
| Line 19: | Line 19: | ||
==Challenges== |
==Challenges== |
||
| − | {| border="0" cellspacing="1" cellpadding="1" style="width:500px; |
+ | {| class="article-table" border="0" cellspacing="1" cellpadding="1" style="width:500px;" |
|- |
|- |
||
! scope="col"|Track |
! scope="col"|Track |
||
| Line 30: | Line 30: | ||
| colspan="6" style="text-align:center;"|Mountain Cats |
| colspan="6" style="text-align:center;"|Mountain Cats |
||
|- |
|- |
||
| − | |[[Osaka]] |
+ | |[[Osaka]] (Rat Race + Kita Run) |
|On the Run |
|On the Run |
||
|Beat 1:50 (Lv. 3) |
|Beat 1:50 (Lv. 3) |
||
| Line 37: | Line 37: | ||
|Beat 1:35 (Lv. 3) |
|Beat 1:35 (Lv. 3) |
||
|- |
|- |
||
| − | |[[Cairo]] |
+ | |[[Cairo]] (Thousand Minarets) |
|Hacker Run |
|Hacker Run |
||
| |
| |
||
| Line 44: | Line 44: | ||
| |
| |
||
|- |
|- |
||
| − | |[[Shanghai]] |
+ | |[[Shanghai]] (The Pearl of the Orient) |
|Hacker Run |
|Hacker Run |
||
| |
| |
||
| Line 51: | Line 51: | ||
| |
| |
||
|- |
|- |
||
| − | |[[Scotland]] |
+ | |[[Scotland]] (Lighthouse) |
|Classic |
|Classic |
||
| |
| |
||
| Line 58: | Line 58: | ||
| |
| |
||
|- |
|- |
||
| − | |[[The Caribbean]] |
+ | |[[The Caribbean]] (Islet Race) |
|Classic |
|Classic |
||
| |
| |
||
| Line 65: | Line 65: | ||
| |
| |
||
|- |
|- |
||
| − | |[[U.S. Midwest]] |
+ | |[[U.S. Midwest]] (Covered Bridge) |
|Classic |
|Classic |
||
| |
| |
||
| Line 72: | Line 72: | ||
| |
| |
||
|- |
|- |
||
| − | |[[Himalayas]] |
+ | |[[Himalayas]] (Cliffhanger) |
|Classic |
|Classic |
||
| |
| |
||
| Line 79: | Line 79: | ||
| |
| |
||
|- |
|- |
||
| − | |[[San Francisco]] |
+ | |[[San Francisco]] (Bridge Finale) |
|Classic |
|Classic |
||
| |
| |
||
| Line 86: | Line 86: | ||
| |
| |
||
|- |
|- |
||
| − | |[[Rome]] |
+ | |[[Rome]] (Alternative Route) |
|Classic |
|Classic |
||
| |
| |
||
| Line 95: | Line 95: | ||
| colspan="6" style="text-align:center;"|Charging Boar |
| colspan="6" style="text-align:center;"|Charging Boar |
||
|- |
|- |
||
| − | |[[U.S. Midwest]] |
+ | |[[U.S. Midwest]] (Navajo Nation) |
|On the Run |
|On the Run |
||
|Beat 2:10 (Lv. 3) |
|Beat 2:10 (Lv. 3) |
||
| Line 103: | Line 103: | ||
| |
| |
||
|- |
|- |
||
| − | |[[San Francisco]] |
+ | |[[San Francisco]] (Downtown Rise) |
|Hacker Run |
|Hacker Run |
||
| |
| |
||
| Line 110: | Line 110: | ||
| |
| |
||
|- |
|- |
||
| − | |[[The Caribbean]] |
+ | |[[The Caribbean]] (Beach Landing) |
|Hacker Run |
|Hacker Run |
||
| |
| |
||
| Line 117: | Line 117: | ||
| |
| |
||
|- |
|- |
||
| − | |[[Cairo]] |
+ | |[[Cairo]] (Subterranean Dash) |
|Classic |
|Classic |
||
| |
| |
||
| Line 124: | Line 124: | ||
| |
| |
||
|- |
|- |
||
| − | |[[Rome]] |
+ | |[[Rome]] (Tiber Cross) |
|Classic |
|Classic |
||
| |
| |
||
| Line 131: | Line 131: | ||
| |
| |
||
|- |
|- |
||
| − | |[[Shanghai]] |
+ | |[[Shanghai]] (The Pearl of Orient) |
|Classic |
|Classic |
||
| |
| |
||
| Line 145: | Line 145: | ||
| |
| |
||
|- |
|- |
||
| − | |[[Scotland]] |
+ | |[[Scotland]] (The Windmills) |
| + | |Classic |
||
| + | | |
||
| + | | |
||
| + | | |
||
| + | | |
||
| + | |- |
||
| + | |[[Osaka]] (Welcome to Osaka) |
||
| + | |Classic |
||
| + | | |
||
| + | | |
||
| + | | |
||
| + | | |
||
| + | |- |
||
| + | | colspan="6" style="text-align:center;"|Rising Tanuki |
||
| + | |- |
||
| + | |[[Rome]] (Complete Tour) |
||
| + | |On the Run |
||
| + | | |
||
| + | | |
||
| + | | |
||
| + | | |
||
| + | |- |
||
| + | |[[Scotland]] (The Path of Wind) |
||
| + | |Hacker Run |
||
| + | | |
||
| + | | |
||
| + | | |
||
| + | | |
||
| + | |- |
||
| + | |[[Himalayas]] (Cliffhanger) |
||
| + | |Hacker Run |
||
| + | | |
||
| + | | |
||
| + | | |
||
| + | | |
||
| + | |- |
||
| + | |[[San Francisco]] (Waterside) |
||
| + | |Classic |
||
| + | | |
||
| + | | |
||
| + | | |
||
| + | | |
||
| + | |- |
||
| + | |[[Shanghai]] (Reach For the Sky) |
||
| + | |Classic |
||
| + | | |
||
| + | | |
||
| + | | |
||
| + | | |
||
| + | |- |
||
| + | |[[U.S. Midwest]] (Covered Bridge) |
||
| + | |Classic |
||
| + | | |
||
| + | | |
||
| + | | |
||
| + | | |
||
| + | |- |
||
| + | |[[Osaka]] (Industrial Revolution) |
||
| + | |Classic |
||
| + | | |
||
| + | | |
||
| + | | |
||
| + | | |
||
| + | |- |
||
| + | |[[Cairo]] (Pharaoh's Games) |
||
| + | |Classic |
||
| + | | |
||
| + | | |
||
| + | | |
||
| + | | |
||
| + | |- |
||
| + | |[[The Caribbean]] (Island Tour) |
||
| + | |Classic |
||
| + | | |
||
| + | | |
||
| + | | |
||
| + | | |
||
| + | |- |
||
| + | | colspan="6" style="text-align:center;"|Stalwart Monkey |
||
| + | |- |
||
| + | |[[Osaka]] (Welcome To Osaka) |
||
| + | |On the Run |
||
| + | |Beat 1:50 (Lv. 3) |
||
| + | |Beat 1:45 (Lv. 3) |
||
| + | |Beat 1:40 (Lv. 3) |
||
| + | |Beat 1:35 (Lv. 3) |
||
| + | |- |
||
| + | |[[Cairo]] (Thousand Minarets) |
||
| + | |Hacker Run |
||
| + | | |
||
| + | | |
||
| + | | |
||
| + | | |
||
| + | |- |
||
| + | |[[Shanghai]] (The Pearl of the Orient) |
||
| + | |Hacker Run |
||
| + | | |
||
| + | | |
||
| + | | |
||
| + | | |
||
| + | |- |
||
| + | |[[Scotland]] (Lighthouse) |
||
| + | |Classic |
||
| + | | |
||
| + | | |
||
| + | | |
||
| + | | |
||
| + | |- |
||
| + | |[[The Caribbean]] (Paradise Resort) |
||
| + | |Hacker Run |
||
| + | | |
||
| + | | |
||
| + | | |
||
| + | | |
||
| + | |- |
||
| + | |[[U.S. Midwest]] (Trainspotter) |
||
| + | |Classic |
||
| + | | |
||
| + | | |
||
| + | | |
||
| + | | |
||
| + | |- |
||
| + | |[[Himalayas]] (Cliffhanger) |
||
| + | |Classic |
||
| + | | |
||
| + | | |
||
| + | | |
||
| + | | |
||
| + | |- |
||
| + | |[[San Francisco]] (Bridge Finale) |
||
| + | |Classic |
||
| + | | |
||
| + | | |
||
| + | | |
||
| + | | |
||
| + | |- |
||
| + | |[[Rome]] (Alternative Route) |
||
| + | |Classic |
||
| + | | |
||
| + | | |
||
| + | | |
||
| + | | |
||
| + | |- |
||
| + | | colspan="6" style="text-align:center;" |Regnant Octopus |
||
| + | |- |
||
| + | |[[Shanghai]] (Shopping Spree + The Pearl of the Orient) |
||
| + | |On the Run |
||
| + | |Beat 1:50 (Lv. 3) |
||
| + | |Beat 1:45 (Lv. 3) |
||
| + | |Beat 1:40 (Lv. 3) |
||
| + | |Beat 1:35 (Lv. 3) |
||
| + | |- |
||
| + | |[[Osaka]] (Refined Finish) |
||
| + | |Hacker Run |
||
| + | | |
||
| + | | |
||
| + | | |
||
| + | | |
||
| + | |- |
||
| + | |[[The Caribbean]] (Islet Race) |
||
| + | |Hacker Run |
||
| + | | |
||
| + | | |
||
| + | | |
||
| + | | |
||
| + | |- |
||
| + | |[[Cairo]] (Thousand Minarets) |
||
| + | |Classic |
||
| + | | |
||
| + | | |
||
| + | | |
||
| + | | |
||
| + | |- |
||
| + | |[[Scotland]] (Lighthouse) |
||
| + | |Classic |
||
| + | | |
||
| + | | |
||
| + | | |
||
| + | | |
||
| + | |- |
||
| + | |[[Himalayas]] (Asphalt Cave) |
||
| + | |Classic |
||
| + | | |
||
| + | | |
||
| + | | |
||
| + | | |
||
| + | |- |
||
| + | |[[San Francisco]] (Rush Minute) |
||
|Classic |
|Classic |
||
| |
| |
||
| Line 152: | Line 340: | ||
| |
| |
||
|- |
|- |
||
| + | |[[Rome]] (Alternative Route) |
||
| − | |[[Osaka]] |
||
|Classic |
|Classic |
||
| |
| |
||
| Line 165: | Line 353: | ||
===Mountain Cat=== |
===Mountain Cat=== |
||
*Purchasing the 1st and 2nd Relay Bundles may be required to unlock the Furai as Syndicate coins given out in Mountain Cat I aren't enough to obtain all 30 blueprints based on drop rates. |
*Purchasing the 1st and 2nd Relay Bundles may be required to unlock the Furai as Syndicate coins given out in Mountain Cat I aren't enough to obtain all 30 blueprints based on drop rates. |
||
| − | *It is recommended to only star up the Furai to {{A9stars|3|4}} |
+ | *It is recommended to only star up the Furai to {{A9stars|3|4}} (rank: '''2,486''') |
===Charging Boar=== |
===Charging Boar=== |
||
| − | *It is recommended to only star up the Shelby GR-1 to {{A9stars|3|4}} |
+ | *It is recommended to only star up the Shelby GR-1 to {{A9stars|3|4}} (rank: '''2,613''') |
===Rising Tanuki=== |
===Rising Tanuki=== |
||
| − | *It is recommended to only star up the Zerouno to {{A9stars|3|4}} |
+ | *It is recommended to only star up the Zerouno to {{A9stars|3|4}} (rank: '''2,937''') |
===Stalwart Monkey=== |
===Stalwart Monkey=== |
||
| − | *It is recommended to only star up the ZR1 to {{A9stars|3|5}} |
+ | *It is recommended to only star up the ZR1 to {{A9stars|3|5}} (rank: '''3,232''') |
===Regnant Octopus=== |
===Regnant Octopus=== |
||
There are 2 ways to unlock the Rimac C_Two with one way being easier than the other. The ways to unlock the C_Two are: |
There are 2 ways to unlock the Rimac C_Two with one way being easier than the other. The ways to unlock the C_Two are: |
||
| Line 283: | Line 471: | ||
===Stalwart Monkey=== |
===Stalwart Monkey=== |
||
| − | [[File:ImagePlaceholder.png|thumb| |
+ | [[File:ImagePlaceholder.png|thumb|220px|Stalwart Monkey (Japanese macaque)]] |
{| class="table-a9" style="text-align:center;" |
{| class="table-a9" style="text-align:center;" |
||
! Points !! Reward |
! Points !! Reward |
||
| Line 293: | Line 481: | ||
| {{a9syndpoints|586200}} || {{a9credits|100,000}} |
| {{a9syndpoints|586200}} || {{a9credits|100,000}} |
||
|- |
|- |
||
| − | | {{a9syndpoints|608200}} || {{A9bpe|2}} ([[Chevrolet Corvette ZR1]]) |
+ | | {{a9syndpoints|608200}} || {{A9bpe|2}} ([[Chevrolet Corvette ZR1 (C7)]]) |
|- |
|- |
||
| {{a9syndpoints|630200}} || {{a9tokens|100}} |
| {{a9syndpoints|630200}} || {{a9tokens|100}} |
||
| Line 299: | Line 487: | ||
| {{a9syndpoints|635000}} || Unlocked Stalwart Monkey III |
| {{a9syndpoints|635000}} || Unlocked Stalwart Monkey III |
||
|- |
|- |
||
| − | | {{a9syndpoints|652200}} || {{A9bpe|2}} ([[Chevrolet Corvette ZR1]]) |
+ | | {{a9syndpoints|652200}} || {{A9bpe|2}} ([[Chevrolet Corvette ZR1 (C7)]]) |
|- |
|- |
||
| {{a9syndpoints|674200}} || {{a9credits|100,000}} |
| {{a9syndpoints|674200}} || {{a9credits|100,000}} |
||
| Line 305: | Line 493: | ||
| {{a9syndpoints|680000}} || Unlocked Stalwart Monkey IV |
| {{a9syndpoints|680000}} || Unlocked Stalwart Monkey IV |
||
|- |
|- |
||
| − | | {{a9syndpoints|696200}} || {{A9bpe|6}} ([[Chevrolet Corvette ZR1]]) |
+ | | {{a9syndpoints|696200}} || {{A9bpe|6}} ([[Chevrolet Corvette ZR1 (C7)]]) |
|- |
|- |
||
| {{a9syndpoints|718200}} || {{a9tokens|100}} |
| {{a9syndpoints|718200}} || {{a9tokens|100}} |
||
| Line 348: | Line 536: | ||
*The AI racers from the event are those from the [[Koenigsegg Jesko (Drive Syndicate)|first Drive Syndicate event]]. |
*The AI racers from the event are those from the [[Koenigsegg Jesko (Drive Syndicate)|first Drive Syndicate event]]. |
||
| + | {{A9DriveSyndicate}} |
||
| − | {{A9SpecialEvent}} |
||
Revision as of 03:28, 11 March 2020
| Overview | Stats | Upgrades | Mastery |
Custom ▾
| Gallery | Misc. |
Events ▾
|
|---|---|---|---|---|---|---|---|
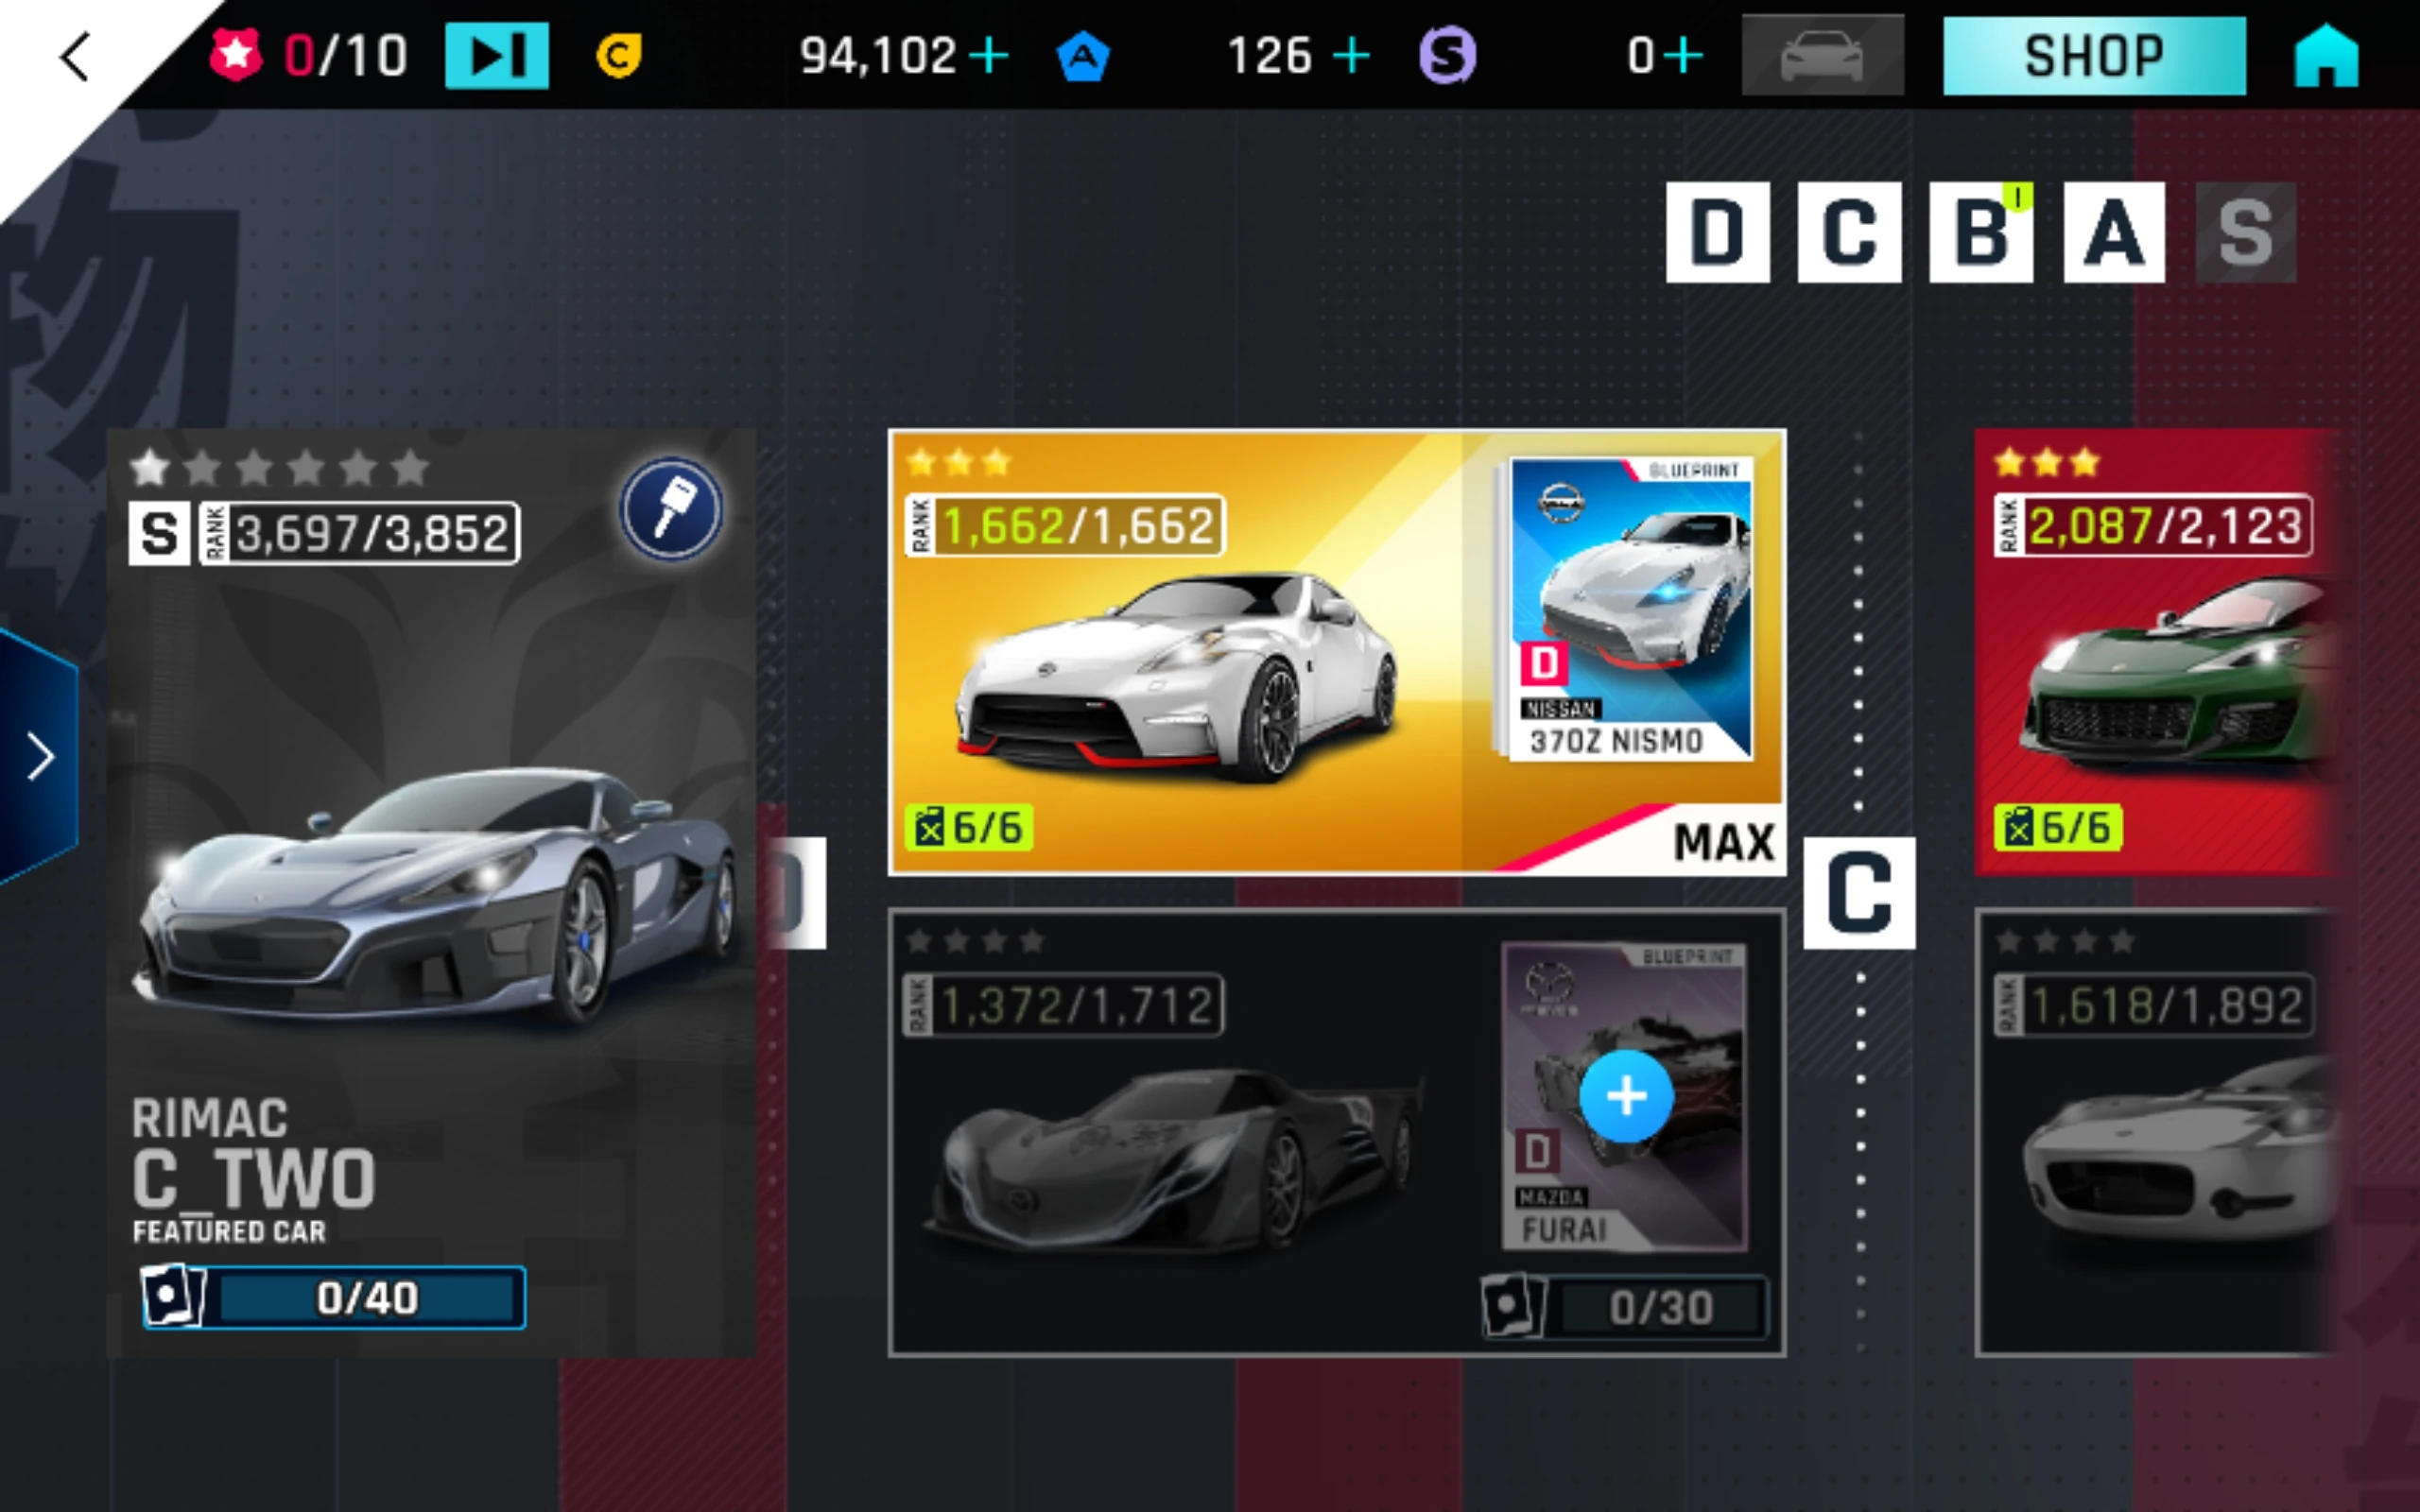
The Rimac C Two Drive Syndicate Special Event was launched as the second Drive Syndicate Event and was available between December 13, 2019 to January 24, 2020.
Car List
- Nissan 370Z NISMO
- Mazda Furai
- Lotus Evora Sport 410
- Ford Shelby GR-1
- Ford GT (2017)
- Italdesign Zerouno
- Ferrari LaFerrari
- Chevrolet Corvette ZR1 (C7)
- Rimac C Two
Cars released during the event
- Mazda Furai (Mountain Cat)
- Ford Shelby GR-1 (Charging Boar)
- Italdesign Zerouno (Rising Tanuki)
- Chevrolet Corvette ZR1 (C7) (Stalwart Monkey)
Challenges
| Track | Race Mode | I | II | III | IV |
|---|---|---|---|---|---|
| Mountain Cats | |||||
| Osaka (Rat Race + Kita Run) | On the Run | Beat 1:50 (Lv. 3) | Beat 1:45 (Lv. 3) | Beat 1:40 (Lv. 3) | Beat 1:35 (Lv. 3) |
| Cairo (Thousand Minarets) | Hacker Run | ||||
| Shanghai (The Pearl of the Orient) | Hacker Run | ||||
| Scotland (Lighthouse) | Classic | ||||
| The Caribbean (Islet Race) | Classic | ||||
| U.S. Midwest (Covered Bridge) | Classic | ||||
| Himalayas (Cliffhanger) | Classic | ||||
| San Francisco (Bridge Finale) | Classic | ||||
| Rome (Alternative Route) | Classic | ||||
| Charging Boar | |||||
| U.S. Midwest (Navajo Nation) | On the Run | Beat 2:10 (Lv. 3) |
Beat 2:05 (Lv.3) |
Beat 2:00 (Lv. 3) | |
| San Francisco (Downtown Rise) | Hacker Run | ||||
| The Caribbean (Beach Landing) | Hacker Run | ||||
| Cairo (Subterranean Dash) | Classic | ||||
| Rome (Tiber Cross) | Classic | ||||
| Shanghai (The Pearl of Orient) | Classic | ||||
| Himalayas | Classic | ||||
| Scotland (The Windmills) | Classic | ||||
| Osaka (Welcome to Osaka) | Classic | ||||
| Rising Tanuki | |||||
| Rome (Complete Tour) | On the Run | ||||
| Scotland (The Path of Wind) | Hacker Run | ||||
| Himalayas (Cliffhanger) | Hacker Run | ||||
| San Francisco (Waterside) | Classic | ||||
| Shanghai (Reach For the Sky) | Classic | ||||
| U.S. Midwest (Covered Bridge) | Classic | ||||
| Osaka (Industrial Revolution) | Classic | ||||
| Cairo (Pharaoh's Games) | Classic | ||||
| The Caribbean (Island Tour) | Classic | ||||
| Stalwart Monkey | |||||
| Osaka (Welcome To Osaka) | On the Run | Beat 1:50 (Lv. 3) | Beat 1:45 (Lv. 3) | Beat 1:40 (Lv. 3) | Beat 1:35 (Lv. 3) |
| Cairo (Thousand Minarets) | Hacker Run | ||||
| Shanghai (The Pearl of the Orient) | Hacker Run | ||||
| Scotland (Lighthouse) | Classic | ||||
| The Caribbean (Paradise Resort) | Hacker Run | ||||
| U.S. Midwest (Trainspotter) | Classic | ||||
| Himalayas (Cliffhanger) | Classic | ||||
| San Francisco (Bridge Finale) | Classic | ||||
| Rome (Alternative Route) | Classic | ||||
| Regnant Octopus | |||||
| Shanghai (Shopping Spree + The Pearl of the Orient) | On the Run | Beat 1:50 (Lv. 3) | Beat 1:45 (Lv. 3) | Beat 1:40 (Lv. 3) | Beat 1:35 (Lv. 3) |
| Osaka (Refined Finish) | Hacker Run | ||||
| The Caribbean (Islet Race) | Hacker Run | ||||
| Cairo (Thousand Minarets) | Classic | ||||
| Scotland (Lighthouse) | Classic | ||||
| Himalayas (Asphalt Cave) | Classic | ||||
| San Francisco (Rush Minute) | Classic | ||||
| Rome (Alternative Route) | Classic | ||||
Strategy
General
- Playing Hazard 3 missions will give you the most Syndicate Coins and Points and help you progress faster.
Mountain Cat
- Purchasing the 1st and 2nd Relay Bundles may be required to unlock the Furai as Syndicate coins given out in Mountain Cat I aren't enough to obtain all 30 blueprints based on drop rates.
- It is recommended to only star up the Furai to

 (rank: 2,486)
Charging Boar
- It is recommended to only star up the Shelby GR-1 to (rank: 2,613)
Rising Tanuki
- It is recommended to only star up the Zerouno to (rank: 2,937)
Stalwart Monkey
- It is recommended to only star up the ZR1 to (rank: 3,232)
Regnant Octopus
There are 2 ways to unlock the Rimac C_Two with one way being easier than the other. The ways to unlock the C_Two are:
- Obtain all 45 to 3 star the Rimac and upgrade it to its max rank (4231). You will need to at least have 700K to do this. You will then be able to complete all 17 RO IV Hazard 3 races.
OR
- Complete all Hazard 2 races. This way will take longer to unlock the C_Two since it will require you to complete 201 races.
Rewards
Mountain Cat
| Points | Reward |
|---|---|
| Unlocked Mountain Cat II | |
| Unlocked Mountain Cat III | |
| Unlocked Mountain Cat IV | |
Unlocked Ford Shelby GR-1 Card Pack Unlocked Charging Boar |
Charging Boar


Charging Boar (Wild Boar)
| Points | Reward |
|---|---|
| Unlocked Charging Boar II | |
| Unlocked Charging Boar III | |
| Unlocked Charging Boar IV | |
Unlocked Italdesign Zerouno Card Pack Unlocked Rising Tanuki |
Rising Tanuki


Rising Tanuki (Raccoon Dog)
| Points | Reward |
|---|---|
| Unlocked Rising Tanuki II | |
| Unlocked Rising Tanuki III | |
| Unlocked Rising Tanuki IV | |
Unlocked Chevrolet Corvette ZR1 Card Pack Unlocked Stalwart Monkey |
Stalwart Monkey


Stalwart Monkey (Japanese macaque)
| Points | Reward |
|---|---|
| Unlocked Stalwart Monkey II | |
| Unlocked Stalwart Monkey III | |
| Unlocked Stalwart Monkey IV | |
Unlocked Rimac C_Two Card Pack Unlocked Regnant Octopus |
Regnant Octopus
Regnant Octopus
| Points | Reward |
|---|---|
| Unlocked Regnant Octopus II | |
| Unlocked Regnant Octopus III | |
| Unlocked Regnant Octopus IV | |
| Rimac C_Two key Rimac C_Two exclusive event decal 2 Rimac C_Two Epic Import Parts |
Trivia
- The AI racers from the event are those from the first Drive Syndicate event.
| Drive Syndicate | ||
|---|---|---|
| Event | Featured Vehicle | Other Featured Cars |
Koenigsegg Jesko
|
Koenigsegg Jesko | Ferrari 812 Superfast • Genty Akylone • Ginetta G60 |
Rimac Nevera
|
Rimac Nevera | Chevrolet Corvette ZR1 • Ford Shelby GR-1 • Italdesign Zerouno • Mazda Furai |
Bugatti La Voiture Noire
|
Bugatti La Voiture Noire | GT by CITROEN • BMW i8 Roadster |
Koenigsegg Gemera
|
Koenigsegg Gemera | Saleen S1 • Nissan GT-R50 By Italdesign |
Syndicate Ops
|
Bugatti Centodieci | Renault DeZir • McLaren 765LT |