The "Earth Season" is now closed and Gameloft still hasn't fixed the multiplayer delayed start bug. Many Android players are usually thrown into a race 10 to 30 seconds after the other racers, leaving them without hope to win anything. Well—not quite. Here's what you can do, especially for less advanced racers, but also for more experienced ones. Some hints and workarounds are specific to the delayed start bug, but many of them are generally useful for multiplayer races.
Please note that all of the data and statements are based on my personal experience and my Android device.
The best news is: Not all races start with a delay. Some tracks even show a countdown, but not always and not always completely. The two most important rule are:
Always prefer these three locations: Alps, Azure Coast and Sector 8. These are the only tracks with an average delay of 0 to 4 seconds.
I've listed the delay times I experienced on different tracks in the table below (click on [Expand] to display). As delay times differ greatly, even from race to race on the same track, I tried to collect up to five values whenever I came across a track, and calculated the average. Tracks with only one value are less reliable than those with five; I'll gradually add more tracks and figures.
Colour codes:
green: 0 to 4 seconds. Go ahead. Use a good car, concentrate, you will get them.
yellow: 5 to 9 seconds. Still ok if you have at least two laps and a car that is correctly multiplayer tuned. Better make no mistakes.
light red: 10 to 19 seconds. Avoid these tracks. It will be hard to reach the top three; you are likely to lose points.
deep red: 20 seconds and above. Whenever this track is displayed: Flee!
Location
Track
Delay ⌀
Delay 1
Delay 2
Delay 3
Delay 4
Delay 5
Alps
Alps
3
0
10
3
0
4
Alps
Alps Reverse
3
2
4
5
2
4
Area 51
Classified
16
18
14
Area 51
Route 375-1
10
10
Area 51
The Secret Lab
14
14
Azure Coast
Azure Coast
0
0
0
0
0
0
Azure Coast
Azure Coast Reverse
1
0
4
0
0
1
Barcelona
Barcelona
22
17
28
25
30
10
Barcelona
Barcelona Reverse
20
20
20
17
19
25
Dubai
Dubai
17
16
7
22
22
17
Dubai
Dubai Reverse
8
8
Dubai
The Mirage
17
20
13
Dubai
The Rose of the Desert
9
9
French Guiana
Fr. Guiana Rev.
3
3
3
French Guiana
French Guiana
5
6
0
8
8
3
Iceland
Iceland
10
15
14
2
7
Iceland
Iceland Reverse
10
5
15
9
London
London
12
15
11
5
16
13
London
The London Eye
7
4
15
5
7
6
London
Westminster Bridge
9
17
0
9
Munich Subway
Market Square
30
30
Munich Subway
Mosaic Motorway
16
15
17
Munich Subway
Rapid Transit
13
13
Munich Subway
Rooftop Raceway
24
24
Nevada
Nevada
14
15
19
20
0
15
Nevada
Nevada Reverse
18
18
22
19
14
19
Patagonia
Avalanche Alley
23
30
22
19
19
Patagonia
Ice Cave
27
32
22
Patagonia
The River Fort
27
17
32
31
Rio de Janeiro
Highland View
26
27
30
20
Rio de Janeiro
Ipanema Showdown
22
32
25
26
13
14
Rio de Janeiro
Oceanview Derby
12
16
19
2
Rio de Janeiro
Rapido Park
13
4
22
San Diego Harbor
San Diego Harbor
13
20
11
12
10
San Diego Harbor
San Diego Harbor Rev.
10
10
11
15
2
10
Sector 8
Sector 8
0
0
0
0
0
0
Sector 8
Sector 8 Reverse
0
0
0
0
0
Tenerife
Cloud Nine
14
7
15
21
14
Tenerife
Dragon Tree
7
0
13
Tenerife
Mount Teide
19
11
27
16
22
Tenerife
Sky Drop
10
9
11
The Great Wall
Buddha's Teachings
23
22
23
The Great Wall
Great Wall Rev.
29
29
The Great Wall
Temple Drive
26
22
30
The Great Wall
The Dragon's Den
25
30
20
26
The Great Wall
The Great Wall
24
26
21
The Great Wall
Wall Ascent
17
17
Tokyo
Tokyo
22
31
15
20
31
14
Tokyo
Tokyo Reverse
25
25
Venice
Venice
1
4
0
0
1
0
Venice
Venice Reverse
6
13
4
3
3
About your car[]
Unfortunately, there's no room for experiments. You have the disadvantage of starting late, so the rest should be optimal:
If you don't own one: Use a car that has a rank below or around 1,000. This means that you won't get as many rating points for a race as with higher ranks, but the higher your car's rank, the higher the probability to get matched against the above-mentioned Audi R8 SE which you are guaranteed to lose against. Audi R8 SEs with a low rank are not very common because the car's R&D required higher tunings to get it—or very good (but rare) skills to finish the R&D with an extremely low tuning. It is, of course, possible to use a car that has a higher ranking than the Audi R8 SE's max pro rank of 1,695. But then you'll enter the arena of the Aston Martin Vulcans and Apollo Intensa Emoziones with very experienced players and very short races. While there is a good chance of starting eight seconds late and catching up in a three minutes race with two laps, there is absolutely none in a fifty seconds race with drivers that fight about every tenth of a second.
Choose a car that has a high difference between stock and max pro rank. Tune it for multiplayer and nothing else (this usually means a tuning of 0505 5050 and variants of this, or 0505 0505 for nitro based cars that gain more speed from nitro pro upgrades than top speed upgrades). For further details, see the "Tuning Cars for Multiplayer" section of the Multiplayer League page. For example, decent multiplayer cars around a rank of 1,000 are the Porsche 959, the Range Rover Evoque Coupe HSE Dynamic and, despite being an elite car, the BMW M2. Even if you use another car that is not explicitly defined as a multiplayer car you will gain an advantage over unexperienced users with "mistuned" cars if you have a proper multiplayer tuning that provides a higher speed at a lower rank.
You may have noticed the "Featured Vehicles" button at the bottom left of your multiplayer screen. Contrary to what one might expect, featured cars are NOT necessarily recommended multiplayer cars. The only reason for cars to be featured is when they are on sale. If you use one of the featured cars you'll get an additional race point bonus for your races. So if you already own a featured car AND it is a good multiplayer car AND you have already tuned it for multiplayer races ONLY then go ahead and use it.
Before and after the race[]
There are two things you can achieve in multiplayer races: a higher rating that results in a higher league with better rewards at the end of the season, and also more race points that will give you many useful rewards already "on the fly" during the season. So, apart from the races themselves, there are several measures you can take in order to improve your chances:
Did you notice the "global bonus" sometimes added to your race points? As far as I can say, this bonus changes every two days. The order is: 0, 0, 25, 50, 50, 25, 25 %. In order to obtain the maximum race points you should prefer playing multiplayer races on days with a 50 % bonus and do nothing but collect tickets on the other days (except the required multiplayer race for the daily tasks). You can find out the current bonus percentage by playing the daily tasks multiplayer race and look at the points breakdown at the end of the race. There's a big difference between 45 or only 30 race points for finishing first.
Do not risk any race points after a race. Under normal conditions, this is a nice chance to get even more points if you also win the following race, but if you had the chance to win a race once, be aware that calculating the risk of the next race is absolutely impossible. You can even get the same track as before, but with 30 seconds delay instead of 10. So if you want to earn race points, always save them.
On days with 0 % or 25 % global bonus, collect as many tickets as you can:
Watch the daily ads. There are 10 per day, and they can sometimes bring you 4 or more tickets.
Play the daily tasks; they often reward you with a ticket.
Play Events that offer tickets as rewards. Sometimes you even get a ticket just for participating.
Log in daily. Usually there are several days per month that grant tickets as a daily login bonus. You can see these days in advance by going to the main screen and choosing My Profile | VIP | Calendar.
If you have less than 4 tickets they will also regenerate automatically after a certain time (one ticket every two hours), but never more than 4.
Before you watch the daily ads or claim event rewards that grant a ticket, always have a look how many tickets you have. If you have less than 4: Wait until they have regenerated. Otherwise tickets from events or daily ads might be in vain. For example, if you have 1 ticket, get 1 ticket from an event and 2 from daily ads you'll have 4 in the end (as automatic regeneration never exceeds 4 tickets). But if you wait six hours until your tickets have regenerated you'll have 7 tickets: 4 regenerated and 3 from the event and daily ads.
The race: getting started[]
Now that you've collected some tickets, multiplayer tuned your car and waited for a day with a 50 % global bonus, it's time to race! Just make sure that you pay attention to these last tips:
Boosters: Go double boosted (nitro starter and tuning kit) whenever possible. You'll need the boosters for catching up with the field after your late start.
Free boosters vs. ad boosters: Always use those boosters first that you can get by watching ads (five per day). Ad boosters give you +1 race, regardless when you start it, whereas free boosters give you +10/15 minutes. As you may have to leave the waiting room several times in order to avoid bad tracks and wait for better ones, along with the increased overall loading times since the Spring Update, most of a time oriented booster would be wasted while waiting and doing nothing. With a race oriented booster you can wait for a good track without getting nervous.
Race mode: When you join the waiting room, choose quickly: Classic or Infected, never Elimination. You need long races, and Elimination is the opposite.
Track: Choose quickly. Always prefer Alps, Azure Coast and Sector 8. When there's no acceptable track available (marked green or yellow in the table above), leave the room and come back again. Keep in mind that Barcelona, Nevada and Tokyo are very popular tracks although they are poison for you. If one of these tracks is offered it's very likely to be chosen by most of the racers. Be prepared to leave the room. Fortunately, Alps and Azure Coast are quite popular, too. Lucky you.
Laps: Always choose 3 laps. As stated above, you need long races to catch up. Even when you have used up your race oriented ad boosters, stay with 3 laps. If a few other racers vote for a 1 lap race, your 3 laps choice will most likely raise the average to a 2 laps race.
As more racers enter the room, keep an eye on the chosen track and the red back button at the upper left of the screen. If the track changes to an unacceptable one and you see that a majority has voted for it, leave the room while the back button is still active. Worst case scenario: Track has changed to a deep red catastrophe, laps have changed to 1, back button is disabled and the timer is counting down ("Race starts in [...] seconds"). Even in this case you can still go back with the hardware back button of your Android device, but you will lose the ticket.
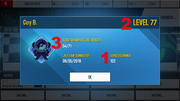
Know your enemy: Have a look at your opponents by tapping on their names. You can't see the cars they'll drive, but you can still deduct a lot from the given information. Here's what it would look like if I was in the room and you tapped on my name: 1: Vehicles owned. The most useful information. The more cars an opponent has the more likely it is that he has a car that can compete with you or beat you. See more detailed information in the following point "Vehicles owned". 2: Level. This is the multiplayer experience level which increases with the XP points you earn when you beat opponents. 99 is the highest level you can reach. An opponent with a high XP level is not necessarily a dangerous opponent, as you can have 40 cars, do a lot of low rank D class races and reach level 99 just by the multitude of your multiplayer races. 3: Achievements unlocked. While the multiplayer XP level is an indicator of how active the player is in multiplayer races, this figure shows how active the player is in general. A very low number might indicate an unexperienced opponent easy to beat.
Vehicles owned: There are certain thresholds during the game which indicate the experience and skills of a player judged by the number of vehicles she/he owns. Assuming that you have a Porsche 959 or a Range Rover with a rank of about 1,000, here are some hints:
Less than 40 cars: No danger. Most likely drives a Chevrolet Camaro GS, a BMW M1 or a less powerful car. Sometimes a Renault DeZir can be a challenge if it leads by more than 15 seconds, but you can usually beat it.
40–80 cars: Might have a Porsche 959 (14 common blueprints) or a Range Rover (token car). Expect some competition.
80–120 cars: Almost surely uses a Porsche 959, a Range Rover or a BMW M2. Driver has very likely already participated in some Championships, has developed skills and knows shortcuts. Expect fierce competition.
120–160 cars: Driver most probably was already there when the Audi R8 SE R&D took place and will drive it in this race. You will lose. If there is only one of these players, you can still do the race and get some points.
160–200 cars or above: A veteran who has seen it all. Most probably drives an Audi R8 SE at this rank and is in Pro or Champion League. But: Go ahead! Usually the player's rating is so high that you'll get points anyway, no matter if you lose against her/him.
Conclusion[]
Be realistic: While many of the above-mentioned hints and workarounds are also useful for future times without the delayed start bug, you still have a significant disadvantage. You can't (or shouldn't) risk race points, and you will finish first much less then you would without the bug. You probably won't reach Pro League, especially because you don't get many rating points for a win, but lose a lot for a lost race when your rating gets near 1,600.
As I deliberately stayed in Challenger League for two seasons because I wanted to get the rewarded cars, I had quite a lot of rating points to recover this time. In the end, I didn't make it to Pro League, but despite all the delayed starts I was able to increase my rating from 1,250 to 1,535.
And as mentioned above, there are two types of rewards for multiplayer races. Even though I never risked race points I could finally reach 7,353 of them which resulted in a considerable amount of rewards:
86,250
250
13 Pro Kit Cards
1 Free Class D Upgrade
1 Nitro Starter
5 Tuning Kits
1 Extra Tank
14 Season Tickets
4 Decals
As you see, it's up to you: You can complain and lament how Gameloft destroyed your multiplayer experience—or you can make the best of it, collect some rewards and have fun!


